|

Measure a Room
Measuring for cabinetry is a crucial part of any room remodel and will ensure the success of your design and installation.
These measurements will help you decide the best placement of your new cabinets. The best way to do this is to record your measurements in the form of a sketch of your kitchen. Knowing which measurements to follow will keep you from purchasing cabinetry that doesn't fit. These steps are easily accomplished by anyone who knows how to read a tape measure.
Follow our guide below to ensure that your measurements accurately reflect the dimensions of your room.
Measuring Supplies:
- Tape Measure
- Plain or graph Paper
- Pencil
Measuring Tips:
-
Begin with a piece of plain or grid paper and roughly sketch the basic shape of the room/area. Hint: This does not need to be drawn to scale, however, the more accurate your sketch, the easier the process.
Start by drawing in all of the walls. Hint: it helps to identify each wall separately with a number or letter.
Next, sketch in the location of windows, doorways, recessed areas, protrusions, islands, peninsulas or any other features. Note: Artistic talent doesn't matter here - only the accuracy of the measurements. - Horizontally measure each wall separately and in a clockwise direction. Then double check the measurements by re-measuring in an anti-clockwise direction (this helps to avoid the same mistakes that you may have made when measuring in a clockwise direction). Hint: Measure twice and order cabinets once (not the other way around)!
-
Measure each wall's total length from one corner to the other in millimetres (mm) not inches. Note: Millimetres is the industry standard for Australian unit dimensions (it also saves time having to convert them later on).
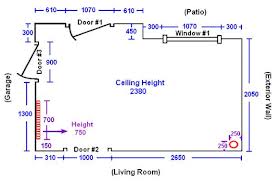
Remember: No space is absolutely square, so take 3 measurements of each wall; one from the floor (if possible), one mid way up (or at bench top height), and the last one at ceiling height (or at the total height that you would like your cabinetry to be). The smallest measurement is then normally the one you would work with, as your cabinetry cannot be bigger than the smallest measurement. - For windows and doors, measure to the outside edges (outer architrave or frame) of surrounding trims. Note the direction your door swings. Measure and record the wall space above and below windows and doorways.
- Measure the width of each structural element like beams, recesses, etc. that are fixed and will not be altered during your renovation.
- Mark the centre-line locations where any existing appliances are, like gas outlets, stove wiring, sink waste, tap connections, etc. Note: This information is useful to know when you are in the designing stage later on, as it can save you money if these don't have to be relocated.
- Locate the centre-line of the sink, by measuring from one corner of the wall (if you want to keep the sink in the same position). If you are re-using any appliances, on a separate piece of paper measure the heights, widths and depths of these appliances for referencing when in the design stage.
- Using a symbol (I do this using a star or lightening bolt), indicate the location of each electrical outlet, switch or light fixture. Indicate the height from the floor and distance to the nearest corner. This illustration shows these symbols indicating the location of electrical outlets, switches and fixtures. Hint: To avoid too much confusion on one plan, you may wish to do a separate drawing for this purpose.
- For height, measure from floor to ceiling in several places and use the smaller measurement. For vaulted or offset ceilings, record the increased height at the point in the diagram where the higher ceiling begins. Remember to include any bulkheads, measuring both height and depth, as the cabinets will be mounted below this.
Remember to check all measurements for accuracy. It may seem tedious, but cabinetry ordered in the wrong size can be expensive to replace.
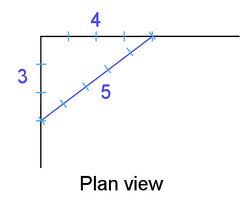
Tip: When measuring a U-Shape wall:
When your measurements are complete on your kitchen cabinet graph, you can now begin to play with the design. You will know exactly how much space you have to work with. This is the part where your careful measuring for kitchen cabinetry begins to pay off.
We hope that this information has been helpful for you.
If you need further help or more information on this topic please:
|